# library(shiny)
# ui <- fluidPage(
#   "Hello, world! We are Statasaurus!"
# )
# server <- function(input, output) {
# }
# shinyApp(ui, server)Week #5
Shiny appsThis article brings my personal experience and resources about this incredible tool called Shiny Apps. Let’s explore it! |
WHAT IS SHINY?
Note
It simply consists of a packages family that facilitates the creation of interactive web tools 💻 using R! (and recently Python too)
Important
Why is Shiny relevant to us?
In simple words, it can make us better data scientists by:
Adding value to our research, increasing the accessibility and visibility. A published paper is great but no the end of the story.
Allowing stakeholders to explore our results in a flexible platform at their own pace.
Offering interactive recommendation guidelines.
- See cornyield0N, DONMaiz, SoybeanVRS
Facilitating the use of software development by peers (e.g. demo of R packages)
- See soiltestcorr, metrica
01. Main features
Shiny has many features that make it unique. My top list is the following:
The main secret of shiny is the reactive programming. This is what if makes it easy to transform R code into an interactive platform that offers “outputs” that react to users’ “inputs”.
A second great feature is a default design of the user interface (⚠️spoiler alert!) based on Bootstrap, which is the reason why we don’t directly need to apply HTML, CSS or Java language by ourselves, this tool does it for us.

The next special feature of shiny is a pre-built collection of widgets that make the app attractive and intuitive (e.g. sliders, check boxes, value boxes, gauges, etc.)
Then, probably the most important for us (no web developers), is its integration with RMarkdown (& Quarto) through Flexdashboard.
Of course, as you get more proficient, you will find there are many more features to squeeze…for more information visit https://rstudio.github.io/shiny/
02. Development options
Important
Today we are going to (briefly) cover the three main development options:
(i) Base Shiny
(ii) Flexdashboard
(iii) UI Editor
(i) Base Shiny
![]()
Base shiny is undoubtedly the most powerful option. However, I personally feel this as the most challenging one in terms of syntax, which is definitely its bottleneck for adoption.
Structure.
Base shiny apps are segregated into two main components:
User Interface (UI)
it controls what and how is being displayed on the application page.
it receives the users’ input to start with the reactive programming.
thus, it includes the text, widgets, plots, etc…
Server
it controls the data that is used to produce the outcomes displayed on the UI.
it normally contains the code to load the libraries, wrangle the data, and define plot functions.
it borrows input values defined by the UI
Both UI and server could be either included into a single file (App.R) or they can be separated into two files to simplify future changes.
Let’s see this with one example
Tip
Create a new project (and directory) along with a script file named “
app.R"file containing a basic app.Go to File > New Project > New Directory > Shiny Web Application.
File > New File > R Script, or use the shortcut “Ctrl + Shift + N”
Then add the following lines
Example with base Shiny
(ii) Flexdashboard
![]()
Flexdashboard is a package developed by RStudio that allows to publish interactive dashboards using R Markdown (& Quarto) syntax.
The main features that I personally highlight are:
Layout: the easiness to specify the app skeleton using row/column based layouts.
Report format: the Rmarkdown format allows the keep a similar format used for our data processing and analysis, so we don’t need to drastically change our usual syntax.
Webpage: we can develop not only the shiny apps but also webpages, blogs with the shiny apps embedded on them.
Formatting: As well as base shiny, flexdashboard can optionally apply Bootstrap and bslib to customize colors, fonts, and more.
Display code in place: for teaching, the RMarkdown syntax using chunks allows us to eventually display the code within the same location on the UI.
UI-Server: There is no need of segregating our code into UI and Server anymore.
Warning
Advanced users consider that flexdashboard is limited in comparison to what one can do with base shiny (Shiny & Shinydashboard packages).
# install.packages("flexdashboard")Example with Flexdashboard
Let’s see now the metrica app code using Flexdashboard
SHINYAPP: https://ciampittilab.shinyapps.io/metrica/
CODE: https://github.com/adriancorrendo/flexdashboard_metrica
(ii) UI Editor
The UI Editor is a tool currently under development intended to remove barriers on the use of base shiny by non-webpage developers.
# install.packages("remotes")

# Install using the remotes package
# remotes::install_github("rstudio/shinyuieditor")
It basically speeds up to process of creating the layout of the UI using an interactive interface. It would be a kind of Shiny App for creating Shiny Apps.
- Code template: the UI Editor will create the necessary code in Base Shiny syntax for us (App.R). Later we would just need to fine tune formatting, fonts, colors, etc. This feature is a claear advantage for cases when we would need advanced features into the layout where Flexdashboard could be limited.
Keep tabs on this cause more resources on the UI Editor are coming soon
03. Deploying the Shiny App
Believe it or not, publishing our Shiny app is quite easy! (with limitations)
We just need to:
Create an account on shinyapps.io (for free!).
Install the rsconnect package in our session.
# install.packages("rsconnect")Account authorization: go to your shinyapps account and copy the TOKEN (showing the secret) provided in your dashboard and run it in your RStudio console at Tools > Global Options > Publishing > Connect … > ShinyApps.io.
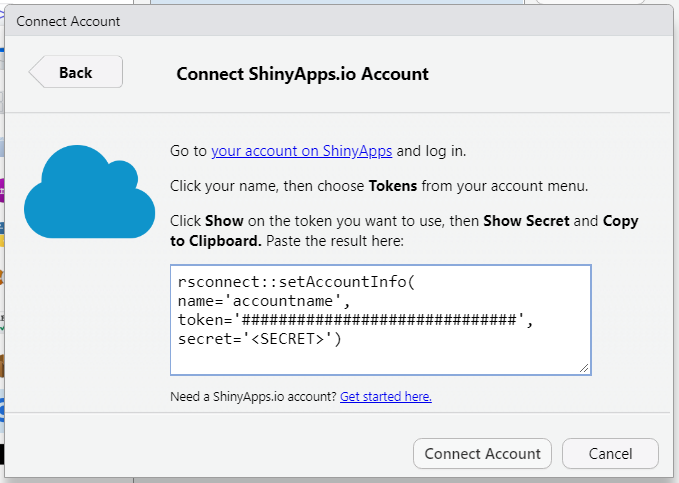
Click on the ‘Publish’ button at the top right corner.
Done!
04. Resources
- Mastering Shiny Book: https://mastering-shiny.org/
- Official User Guide: https://docs.rstudio.com/shinyapps.io/
- Shiny Tutorial: https://shiny.rstudio.com/tutorial/
- Shiny Gallery: https://shiny.rstudio.com/gallery/#demos
- Flexdashboard Shiny Gallery: https://pkgs.rstudio.com/flexdashboard/articles/examples.html